
Let’s start by some OAuth definition from Wikipedia and try to break it down:
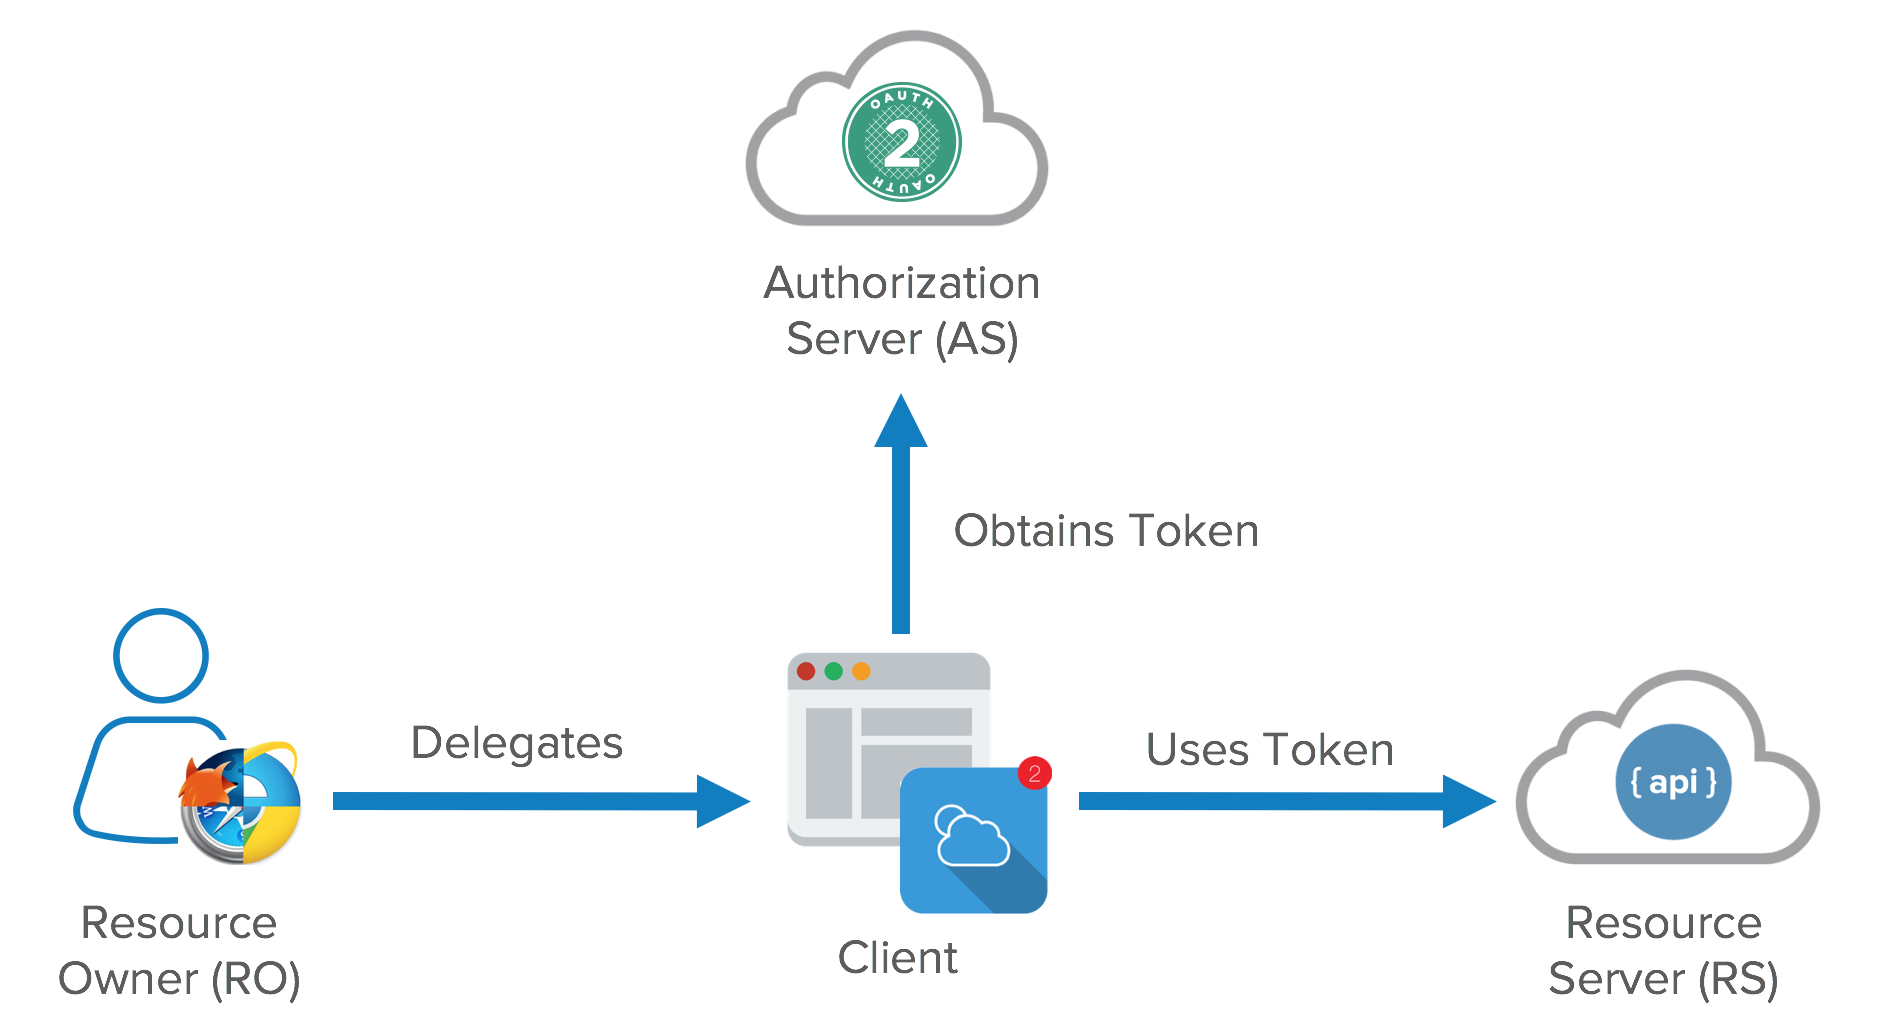
“OAuth provides to clients a “secure delegated access” to server resources on behalf of a resource owner. It specifies a process for resource owners to authorize third-party access to their server resources without sharing their credentials”
So, what do we have here ? We have a server that contains resources belonging to someone. That’s easy to understand. For example, the facebook server(s) contains information (profile, posts, photos, …) about its users. The owner of the information is the user itself. And there is a third-party. For example, Amazon web application. And the user wants Amazon to be able to access his Facebook profile without providing his Facebook credentials to Amazon. Let’s now see who is who according to the OAuth terminology:
facebook server = Resource Server (the one who hosts the resources)
Amazon app = Third-party, also called the “Client” (the one who wants access to the resources)
facebook user = Resource Owner (the one who owns the resources)
profile, posts, photos, … = available Scopes
OAuth allows a third-party to access these resources through an access token. Maybe you can already imagine that we are missing one more component here. How does the resource owner consents to this ? And how the client gets an access token ? This is where the Authorization Server comes on the scene. It an application that implements the OAuth protocol and handles these two tasks. The Authorization server is usually set up by the same party who runs the Resource Server(s).
So far the stage looks like this:
Of course, OAuth definition is wider than our example and many different scenarios can come up that fit to this definition. For that, OAuth defines many different ways an access token can be obtained. These ways (methods) are called Grant Types and we are going to examine some of them in order to better understand what is OAuth and where it can be used. Before that, we need to describe a common preparation step that is common to all the scenarios. For the sake of simplicity, we will call ResourceApp the web application that runs on the resource server.
The owner of the Client application (ClientApp for now on) goes to the Authorization Server (AuthServer from now on) and informs it that he wants to make ClientApp able to retrieve resources or access services from ResourceApp. AuthServer provides to ClientApp a set of a “client_id” and a “client_secret” credentials. These credentials can be used so that ClientApp can identify itself in case of communication with AuthServer.
Now we are ready to examine the different grant types.
Authorization Code Grant Type
Typical use case: Let’s say ResourceApp contains data or provides services to its users. One of these users is Mike, who is also a user of ClientApp. And let’s assume that ClientApp, in order to provide some services to Mike, needs access to some data related to Mike that are stored by ResourceApp or needs to access some services provided by ResourceApp on behalf of Mike. For example, ClientApp may want to access Mike’s profile on ResourceApp in order to be able to make some product recommendations to Mike or may just want to let Mike login using his account credentials on ResourceApp (so that Mike doesn’t have to remember two different sets of credentials for ClientApp and ResourceApp).
How it works: The following diagram gives a rough description of what is happening when using this grant type. This grant type uses the “famous” 3-Legged OAuth.
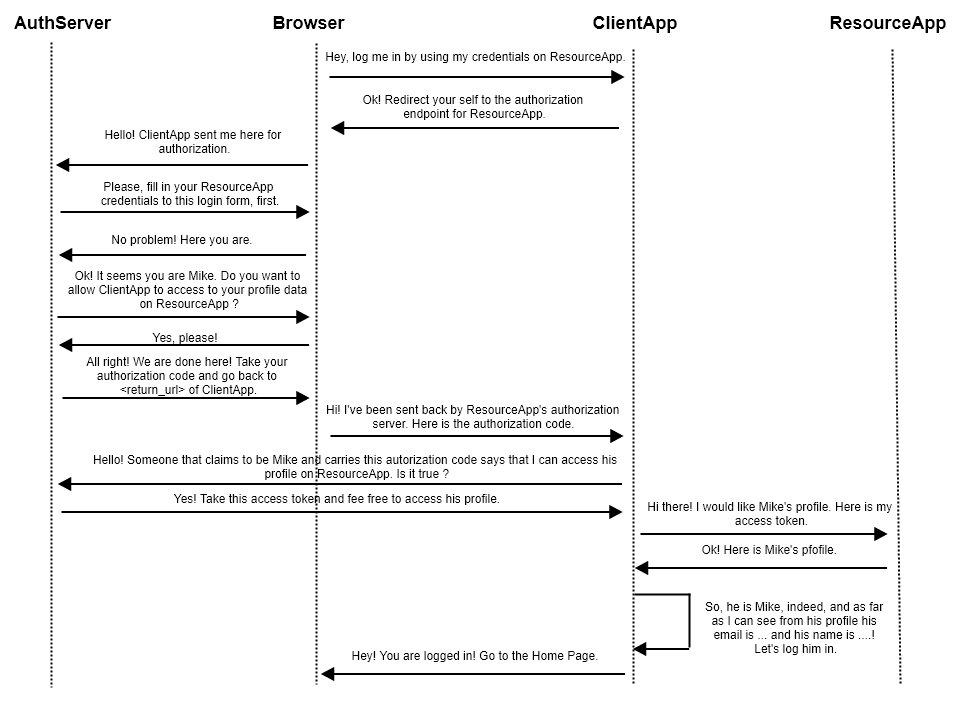
Now let’s make a more detailed description. When the user asks ClientApp to login through his ResourceApp credentials, ClientApp redirects the user to ResourceApp’s Authorization Server. The redirection URL contains some parameters that will be used in the following steps:
‘response_type’ => ‘code’ (specify the grant type)
‘client_id’ => ‘<client_id>’ (let the AuthServer know the redirection was asked by ClientApp)
‘redirect_uri’ => ‘<return_url>’ (so that AuthServer knows how to send the user back to ClientApp)
‘scope’ => ‘profile photos’
Scopes have been defined in ResourceApp and they indicate data and services that will be accessible by the ClientApp through OAuth. redirect_uri is the ClientApp ‘s URL we wish the user to return after authentication. So, ClientApp ‘s authentication page will ask the user to login and approve ClientApp ‘s access for the requested scopes. Then, the user will be redirected back to ClientApp with the following parameters loaded in the URL:
‘code’ => …
‘state’ => …
ClientApp will send a POST request to Authorization Server, in order to verify that the user is not lying about the status, using the following parameters:
‘grant_type’ => ‘authorization_code’,
‘client_id’ => ‘<client_id>’,
‘client_secret’ => ‘<client_secret>’,
‘redirect_uri’ => ‘<redirect_uri>’,
‘code’ => ‘…’
Authorization Server will respond with a JSON object containing the following:
‘token_type’ => ”,
‘expires_in’ => ‘…’,
‘access_token’ => ‘…’,
‘refresh_token’ => ‘…’
Now, ClientApp can access the requested scopes at ResourceApp using the acquired access token.
Client Credentials
Typical use case: This grant is suitable for server-to-server (or, more accurately, application-to-application) authentication. For example, when an application is calling third-party services that don’t require a user’s permission. You can thing of it as making calls on behalf of the user who created the application. The calling application can even be a cron job running on another server and needs to periodically perform some maintenance tasks over an API.
How it works: This grant type handles a simpler case where the ClientApp is also the resource owner. So there is no browser or, generally, an end user. The only thing needed is that ClientApp proves itself to ResourceApp. And this can be easily done by the combination of “client_id” and a “client_secret” that ClientApp has in its possession. So, ClientApp makes an HTTP request to the Authorization Server and as a response it gets an access token associated with an expiration date. Now it can access the Resource Server.
The aforementioned request through which we obtain the access token looks like:
https://appA.com/token?client_id=<client_id>&client_secret=<secret>&grant_type=client_credentials
What kind of access is granted through this token is defined at the time we configure the “client_id” and “client_secret”. They do not expire and can be used to renew the access token every time it expires. Of course, this may not be the desired behavior, which leads us to the next grant type.
Implicit Grant
The implicit grant is similar to the authorization code grant with two distinct differences.
Firstly, It is intended to be used for “user agent”-based clients (e.g. single page web apps) that can’t keep a client secret because all of the application code and storage is easily accessible.
Secondly, instead of the authorization server returning an authorization code which is exchanged for an access token, the authorization server returns an access token.
So, the first step is similar to the previous method. ClientApp will redirect the user to Authorization Server passing the following parameters:
‘response_type’ => ‘token’,
‘client_id’ => ‘<client_id>’,
‘redirect_uri’ => ‘<return_url>’,
‘scope’ => ‘profile photos’,
‘state’ => ‘<CSRF token>’
The CSRF token field is optional but highly recommended. Still, the user has to login to ResourceApp and approve ClientApp’s request for access. Then, the user will redirected back to ClientApp through a URL that carries the following parameters:
‘token_type’ => ‘Bearer’,
‘expires_in’ => ‘…’,
‘access_token’ => ‘…’,
‘state’ => ‘<CSRF token>’
No refresh_token is being used in this grant type because the browser has no way to keep it secret.